 Plushify
In the previous chapter we specified the seams and generated a pattern for the plushie. Now it's time to look at the individual pattern pieces of the plushie. To do that, click on the "Pattern" section on the left.
Interacting with pattern pieces
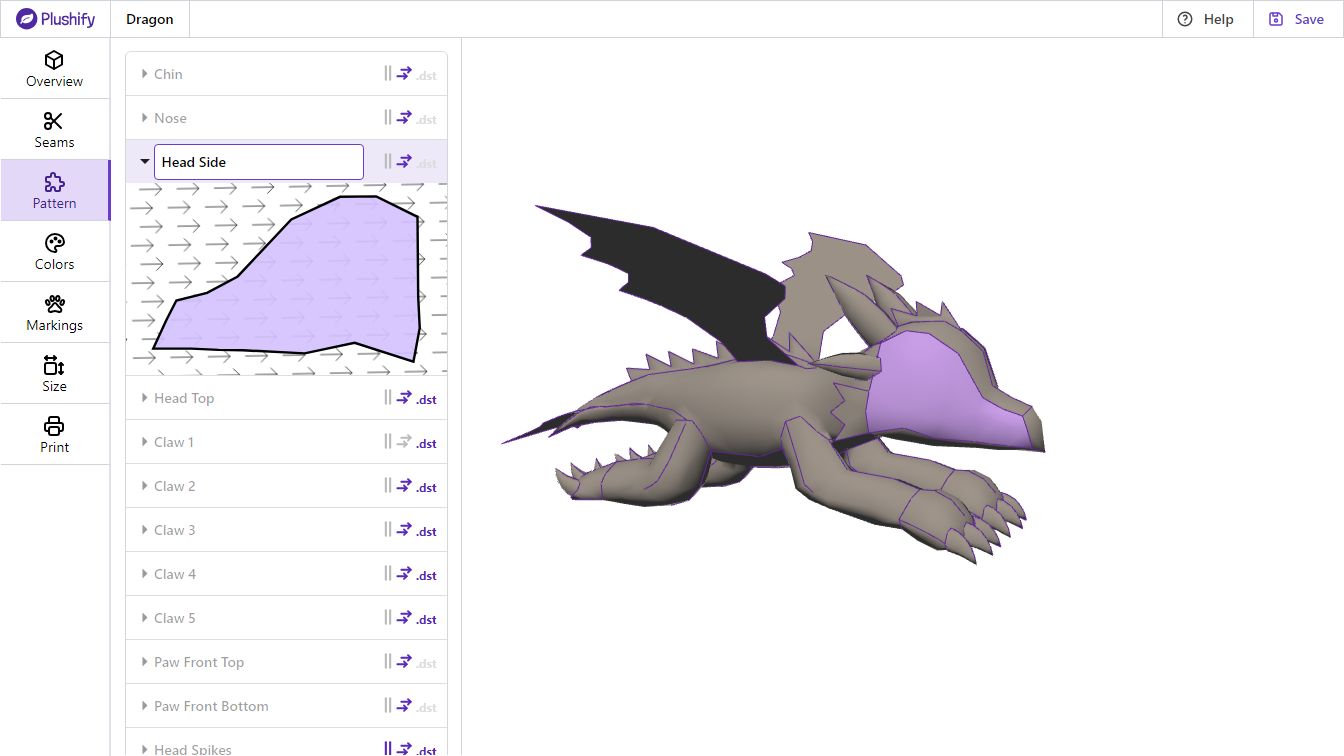
When hovering over the model, the individual pattern pieces are highlighted. Clicking on the model will select the pattern piece you clicked on.
On the left, you can see a list of all pattern pieces of your plushie. The selection is synchronized between the list and the 3D model, so if you select a piece in the list, it will also be highlighted in the 3D model.
When a pattern piece is used multiple times, e.g. for the left and right side of the plushie, all copies of the piece are highlighted in the 3D model. Each copy has a dark outline so you can see where they have to be sewn together or to other pieces.
When hovering over a piece either in the 2D preview or on the 3D model, a red marker will indicate the position you pointed to. This red marker is synced between the 2D and 3D view. This allows you to better understand how the pattern piece corresponds to the model.
If you notice a size change of the red hover indicator in the 3D model view, this indicates that the pattern is of low quality, because a relatively small area of the 2D pattern needs to be stretched to a large area in the 3D model. You can fix this by adjusting the seams.
Naming a Pattern Piece
After selecting a piece, you can enter a name for it in the list on the left. This name will be used in the printout of the pattern to help you tell the different pieces apart.
Marking Flat Pieces
Some pieces need two copies, even if the 3D model only contains them once. E.g. if your plushie has flat claws that are sewn into a seam, the claws might not have any volume in the model. Both sides of the mesh triangles would be visible.
If you intend to sew those pieces by using a single piece of fabric (e.g. felt), this works well. However, if you want to sew those pieces by using two pieces of fabric, either to give it some volume or because you are working with one-sided fabric like Minky, you need to indicate that you need two copies of this piece.
By marking the piece as flat using the button, Plushify will consider the piece twice when it comes to fabric amount calculations and cutting instructions. If your fabric has fur, pieces marked as flat will be rendered with fur on both sides.
Exclude Pattern Pieces from Print Pro Only
Sometimes you might not want to have all pattern pieces that are in the model to show up in the printed pattern. For this, you can specify for each pattern piece whether it should be included or not.
If a piece is excluded here, it will not show up in the printed pattern, in the .svg export, and it will not be considered for calculations how much fabric is needed for the project. Excluded pattern piece will still show up when exporting the model itself via .obj download.
Setting the Fur Direction
When making a plushie, you want to make sure that the fur falls nicely in a consistent direction. That's why it is important to specify the fur direction.
You can set the fur direction directly on the 2D pattern piece by clicking and holding the left mouse button and then dragging in the direction the fur should fall. During this dragging operation, a red arrow will indicate the fur direction.
After the fur direction has been set for a piece, arrows will display the specified direction in the 2D pattern preview as well as on the 3D model.
As alternative to setting the fur direction on the 2D pattern piece, you can also perform a similar operation on the 3D model: For that, first click on the fur direction button in the top left corner of the 3D preview. Then, in the 3D preview of the plushie, click and hold the left mouse button at the front of any pattern piece. Then, drag your mouse cursor to the end of the piece and release the left mouse button. Think of it as gently stroking the virtual plushie along the fur direction.
You can repeat this process for all the pattern pieces you want to set the fur direction for. To stop setting the fur direction, click on the fur direction button again or click anywhere else in the 3D preview.
The fur direction is used to render fur if you have any fabrics that have a pile length. The fur direction is also indicated in the printout and used in the calculation how much fabric you need for the plushie in the size section.
With the pattern of the plushie done, we can continue by specifying which fabric we want to use for it.
Next chapter: Setting Colors and Fabrics for your Plushie