 Plushify
In the previous chapter we imported a model as .obj file in Plushify. Now it's time to specify where the seams of the plushie should be. Plushify will use the seams to unwrap the model and generate the pattern. To get started, click on the "Seams" section on the left of the plushie page.
Specifying seams on the 3D model
On the right side you see a 3D preview of your plushie model. You can use your mouse to rotate it (click and drag), zoom in and out (mouse wheel), and move it around (drag with middle mouse button).
When hovering over the model, individual vertices are highlighted. Clicking on a vertex enters the seam selection mode. Hovering over another vertex shows you a preview of the seam that will be created.
Clicking on another vertex then sets a seam between the two selected vertices. If a seam already existed between the two vertices, it is removed instead.
The seams will follow the edges of the model. If the seam is jagged, there likely is no straight edge where you want the seam to be. The seam then follows the edges that are closest to the line you want. The way to fix this is to add additional edges where you want the seams to be. Check out the section on preparing your .obj file to learn how.
Using non-manifold meshes
In addition to the seams you set, Plushify will consider every non-manifold edge a seam, which is why you might have more pattern pieces than expected when setting the initial seams. These additional edges are:
- Edges of the mesh itself: If you have a non-manifold mesh, the openings or holes form a natural seam because that's where the fabric ends. Using the opening, Plushify can generate a pattern for those pieces. Often it is necessary to set additional seams in order to get a good pattern for those pieces.
- Edges where three or more faces meet: If you have an edge where three faces meet, you need a seam in order to replicate the model in plush. In those cases, you would sew the third face into a seam between the first two faces.
These types of edges form natural seams that cannot be removed.
Creating the sewing pattern from the seams and model
After you are satisfied with your seam selection, Plushify can generate the sewing pattern for you. To do so, click on the "Calculate Pattern" button to the left of the 3D model. This will calculate the sewing pattern based on the 3D model and the seams you selected. The calculation can take some time; the progress is displayed below the "Calculate Pattern" button.
After the pattern calculation is completed, a preview of the sewing pattern is displayed above the "Calculate Pattern" button. Additionally, the process of how the pattern was derived from the model is displayed as animation of the 3D model. This helps you get an understanding of how the 3D model and the seams you defined influence the sewing pattern.
You can control the playback speed of the animation using the wrench menu next to the "Calculate pattern" button. In addition to the different playback speeds, you can also select "Calculate Automatically". Enabling this option will automatically update the sewing pattern whenever you add or remove a seam, without the need to manually click the "Calculate Pattern" button. In this mode, no animation is played.
Using the pattern quality view
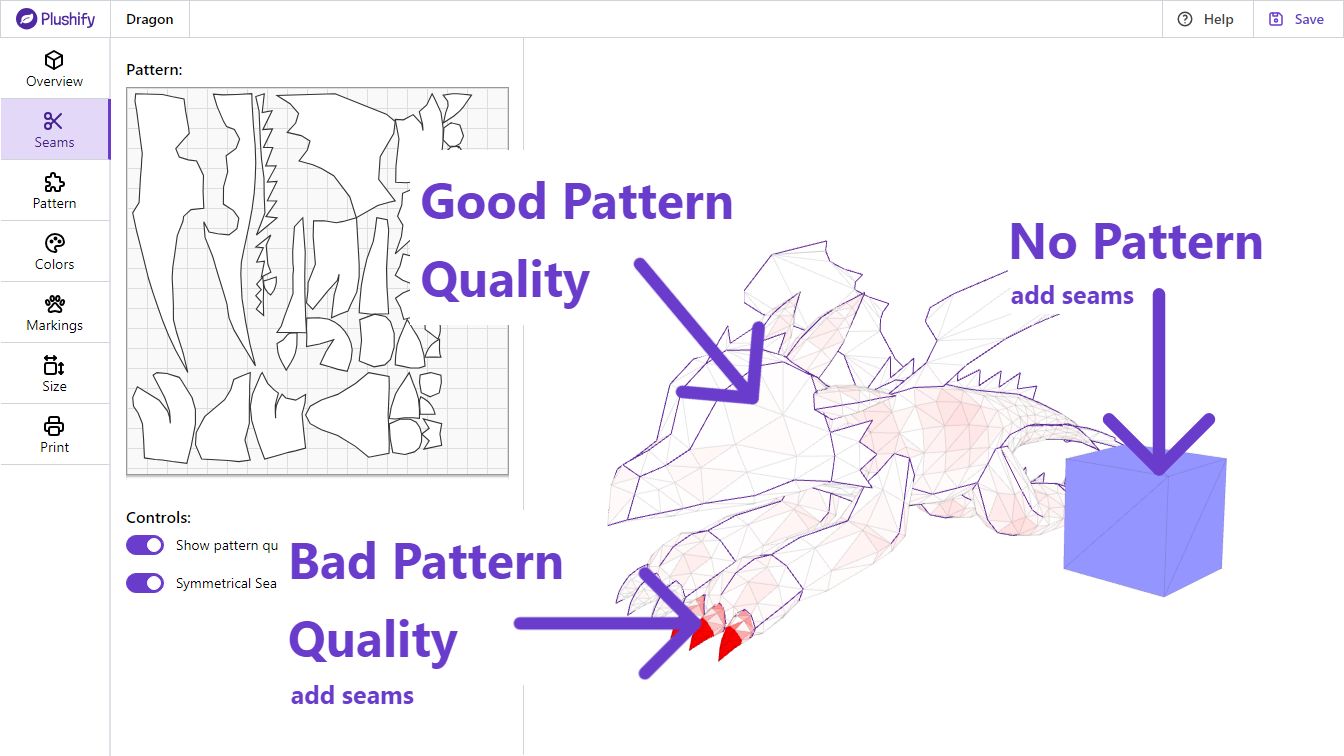
You can switch on the "quality view" using the controls below the pattern preview. When the quality view is active, the 3D model is colored in shades of red.
Areas that are white or slightly red show where the generated pattern is of very good quality. After assembling the plushie, it will look similar to the 3D model.
Areas that are intensely red show where the generated pattern differs significantly from the 3D model. In those places, the algorithm had to distort the pattern because the specified seams did not allow for a better unwrapping. You can improve the pattern by adding more seams or darts in the areas that are very red.
Some areas might be colored blue. For those areas, no pattern could be generated. This is usually the case if a model does not contain any seams at all. Try placing some seams to generate the pattern for those models.
Using Symmetrical Seam Selection
Most plushies are symmetrical and use the same pattern on both sides. By enabling "Symmetrical Seam Selection" you can easily add seams on both sides of the plushie at the same time.
This feature will only work correctly if you have aligned the plushie correctly when you imported the model. Otherwise Plushify cannot correctly determine which is the right and left side of the plushie.
Please note that the Symmetrical Seam Selection has no influence over pattern piece reuse. So even if you disable the Symmetrical Seam Selection, if the left and right side use the same pattern, it will be included only once when printing the pattern.
Downloading the pattern and model as .obj file Pro Only
If you want to use the model with the generated pattern in another program, you can download the model as .obj file. The pattern will be included in the file as UV map (texture coordinates).
The .obj file will be different from the one you initially uploaded to Plushify, because Plushify processes the model in order to generate the sewing patterns (e.g. triangulating the faces and using the size specified in the size section).
Now that we have the pattern of the plushie, it's time to look at the individual pattern pieces and assign names and fur directions.
Next chapter: Working with the Pattern