 Plushify
The challenge of making Plushie Patterns

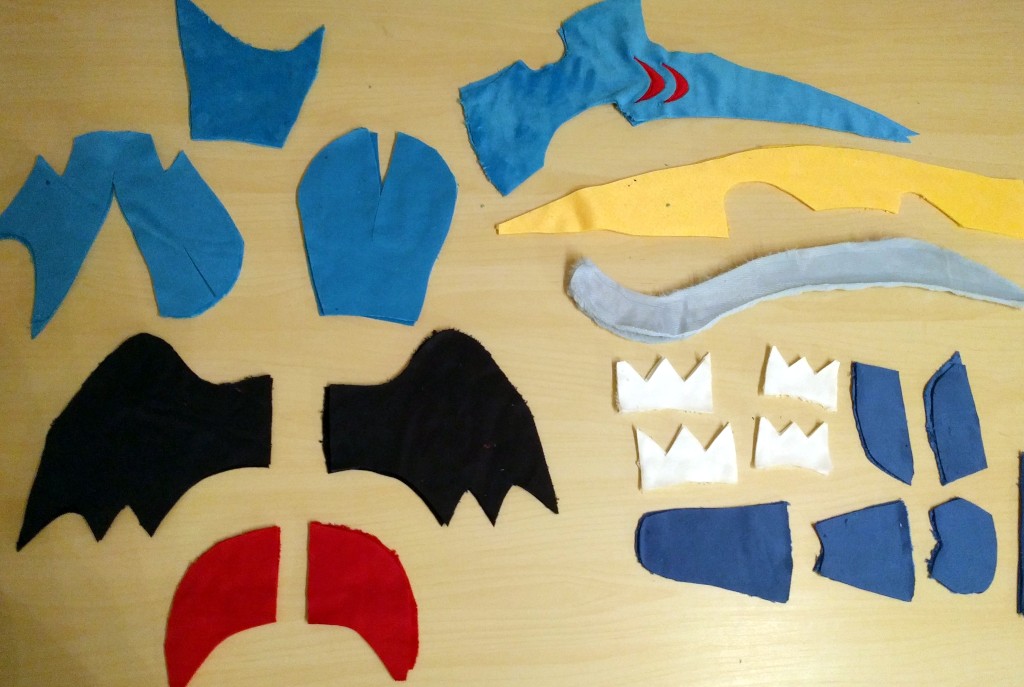
If you want to make your own plushie, you need a pattern. Based on the pattern and its instructions, you will cut the fabric and sew it together. In the end, the look of your plushie is defined by the pattern.
If you want to make a plushie of a popular character, you could be lucky and find a pattern online. In fact, that is a good way of getting into plush-making. But at some point you might want to make a plushie of your own design. And then you need to find a way to create a pattern for it. There are multiple approaches you could take:
Trial And Error
One of the most common approaches is to just try stuff and see what works. Some of the most experienced plushie-artists take this approach. But this is also its shortcoming: You need knowledge and experience to know what works and until then there will be lots of failed attempts, wasted time and fabric.
Disassembly
Since a pattern sewn together creates a plushie, this process can be reversed by taking apart a plushie by the seams. The individual pieces of the plushie then form the pattern.
If your design is similar to a plushie that already exists and you just want to use a different kind of fabric or colors or add simple details, this approach could work. However, if your design is really unique and you cannot find a similar plushie, you cannot use this approach. And even if you would find a similar plushie, could you really cut it apart? 🥺
So if we cannot use an existing plushie as basis for the pattern, could we make something similar that we can take as a basis?
The Tape-Dummy
Instead of using an actual plushie, we could create a sculpture in the shape of the plushie we want to make, e.g. by using paper mache. We could then cover the sculpture completely with little pieces of tape. So instead of having a plushie that is filled with polyfill and surrounded by fabric, we have a sculpture that is made of paper mache and surrounded by tape.
We can then mark the seams on the tape and cut the tape along these seam lines. This will give us the pattern template without relying on existing plushies.
But this technique also requires artistic talent and time and material to create the prototype sculpture.
What if we could use a digital sculpture instead?
Going Digital
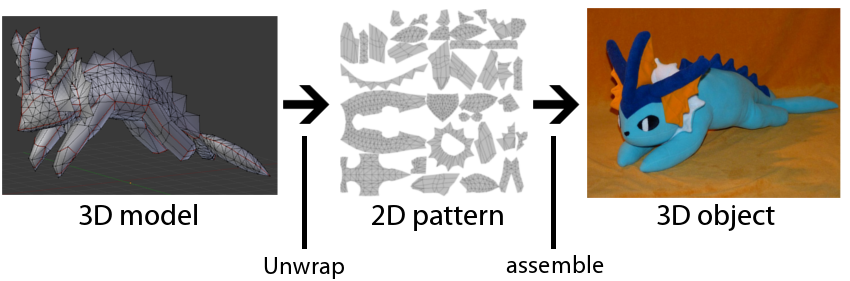
What is a plushie pattern? It is a two-dimensional representation of a three-dimensional object. We cut pieces of two-dimensional fabric, sew it together and have a three-dimensional object in the end. To create a pattern, we go the other way round: Have a 3D model and cut it apart so it can be flattened to two dimensions.
Creating 2D representations of 3D models is widely used in the film- and videogame-industry to add textures to their models. The process of converting a 3D model to 2D is called UV-mapping.
Plushify uses the same concept. Instead of adding textures to a digital model, Plushify uses the UV-map to create a sewing pattern so that your digital model can become a cute and cuddly plushie.
But first, we need a digital model. Check out the next chapter to learn how to create a digital model that can be used to create a plushie pattern with Plushify:
Next chapter: Preparing your .obj file